|
Details
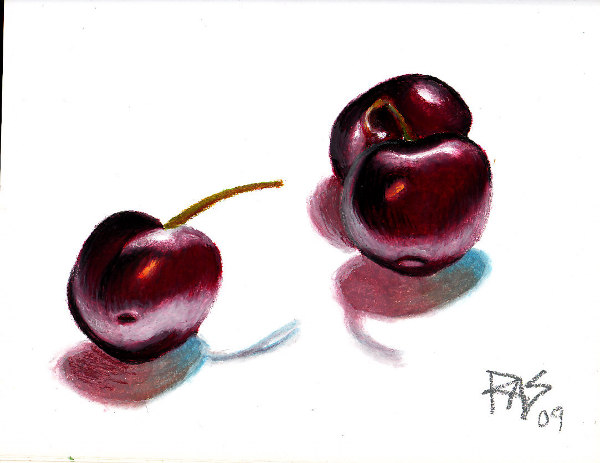
There are several ways to approach details in oil pastel painting. One of the simplest is just to work large. In my "Cherries" painting, I did exactly that -- took three inch-sized black cherries and set them out on a white sheet of paper, then painted them about three times their real size on an 8 1/2" x 11" piece of acid-free drawing paper. Depending on what you want to do with the painting, you can then reduce the scan to any size you want. On this site I couldn't post the full scale image of Cherries, so the details in the painting seem very delicate compared to the original. They show beautifully even in a thumbnail, when the size goes down this type of work looks almost photographic. The important thing to remember in painting realism is that getting the color accurate in hue (what color it is), intensity (how bright or muted it is) and value along with the shapes of color areas will give depth and suggest more than they tell. Your strokes can be big, loose and painterly but you won't lose the true rendering if you focus on shapes of color masses. Think about the paint by number kits you may have seen or tried. I was amazed at them when I was a kid. The line sketch was always accurate, a painter worked out the exact mixtures for me and if I stayed within the lines -- a good picture emerged. It wasn't my painting but it was good practice. The main problem that Paint By Number approach has for painting is that every color and value area has a hard edge, so you don't get the soft blended gradations that objects have in life. You can get around this even on a Paint By Number set by looking at the real subject and blending the paint to softness where it needs it. This is easier in oils or watercolor than acrylic, you have to work fast in acrylic. In oil pastels it's very easy because you can just make short strokes back and forth with both color sticks till they're blended softly. Soft edges between color areas in the shadows and on the soft bluish highlights on the cherries themselves help to make them seem more real and rounded. So this way of getting details doesn't really involve doing many. Just make sure that key details like the stem and the highlight on the stem are put in last, after you have the full effect of accurate color and value shading within each hard-edged area of the painting. I softened the edge of the shadows with white after I got them in lightly. I didn't press hard at the edges of the shadows and created some broken color, then went over that burnishing with white and it blended out smoothly with the paper. But let's say you want more detail or you're working on a small size for a specific reason. There are other ways to do it besides scaling up the entire picture to where even the smallest stroke is still pretty large.

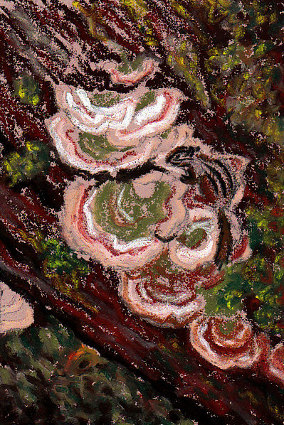
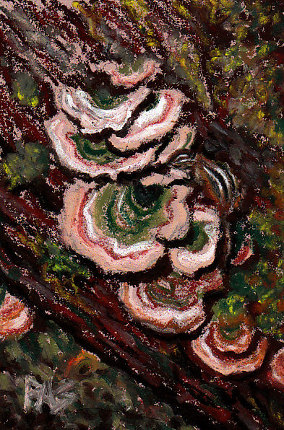
For Shelf Fungi and Chipmunk, I began by sketching from a July 2009 Oil Pastel Challenge reference at WetCanvas.com posted by Wildart12 in the Oil Pastels forum. I worked from memory, some old sketches and a quick glance at the Artist's Photo Reference: Wildlife by Bart Rulon page of Townsend's Chipmunk photos for markings to create the chipmunk nibbling at the shelf fungi -- small animals do eat these and I think some varieties can be eaten by humans. My line sketch in HB graphite pencil (a normal No. 2 pencil) on Rose Grey Art Spectrum Colourfix paper was not as detailed as the Paint by Number style of sketching. I drew in the log, the basic outlines of the fungi, a few lines to suggest shadows and leaves and only got detailed on the chipmunk. I drew him three or four times before I was satisfied I had a good natural pose. Even at this stage I began detailing with pointillism on the moss areas. Textures can give a good impression of small details that you wouldn't be able to get with a blunt stick or even the edge of a brand-new or chisel-edged stick of oil pastel. I used Sennelier oil pastels to sketch in bark texture lightly. Notice how when the strokes skip over the valleys and stick to the peaks of the grit, a great stippled texture is created. Some details can be done by using broken color, leaving little specks of the background to represent either texture or a specific small color area by not blending everything together with multiple layers or a blender. I used loose calligraphic and painterly strokes, then varied my pressure to create areas of heavy color and areas of stippled-looking broken color with pink-gray specks showing through the darks. Calligraphic strokes become graceful, swooping, thick and thin, and may wiggle. They aren't straight lines or dots. Think of them as similar to beautiful handwriting -- graceful loops or curves or swirls, abrupt changes in direction, expressive lines. So when you see this term in an art review, that's what it means. Painterly strokes are exactly that. Often using more pressure, they build up an impasto-like texture and look more like brush strokes than something drawn. Areas and splashes of color blending into its neighbors are painterly strokes. They don't need to be very large to have this quality, the main thing is that your strokes are visible and distinct, not blended smoothly in to where the viewer can't see any strokes as in some areas my Cherries example, especially the shadows and the dark-red shaded areas. I sketched in the black lines on the chipmunk's coat with a Walnut Hollow oil based colored pencil and then set it aside overnight to think about how much detail I wanted to add in this small 4" x 6" painting. The background looked good the way it was, the shelf fungi weren't finished and I had to do something to make the chipmunk a little more distinct and natural looking.

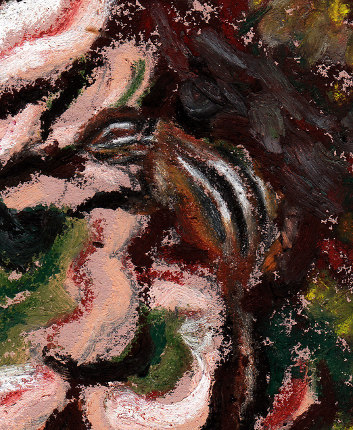
If you aren't sure how much detail to add, let it rest overnight or for a couple of days. For one thing, your oil pastels will set up so additional strokes and layers can go on without blending into what's under them as easily, especially if you use Sennelier oil pastels. The other good reason is that it's easy to overwork a painting when you're right on top of it looking close. Unnecessary detail can be as damaging or more annoying than too little. You can always add more detail but it's harder getting rid of it or getting back to a loose broken-color texture. So I was glad I waited to finish until today. I knew that at the very least, I needed to get in the white lines on the chipmunk's coat and a little more work on the shelf fungi, especially adding their strong shadows. Less is more. Those shadows did not need to be depicted by an oil pencil line. They looked much better when I brought in two or three dark colors and followed around the undersides of the overlapping shelves with a thick-and-thin calligraphic line. I pressed medium hard, harder where I wanted the line broader, and rolled the stick to get an edge on the tip when I needed it narrower. The painting may only be 4" x 6" but people are more likely to look at it from a comfortable distance of maybe an arm's length, not by putting their eyes a few inches away the way I do while I work. This is good for getting delicate accuracy in small areas but it's not how the final effect should look -- or your details will be lost for being too small to see. Finally, I used Walnut Hollow oil pencils in the chipmunk's coat and to add a couple of lines into the green areas of the fungi. More than that, I adjusted the values and finished some areas that were adjacent to the chipmunk in order to balance him better with his background. He's partly camouflaged now, you don't see him at the first glance, but once you look at the shelf fungi you can see his small form curving around next to them between a light area and a very dark area. I touched in details elsewhere on the painting just using my Sennelier sticks. This is where being aware of edges and contrast matters a lot. A dot is a detail. A lot of dots in similar but not identical greens make a good moss texture. Slamming some dots of Cadmium Lemon into those greens brightened the green moss, and streaking more of the Cadmium Lemon over bark areas implied a different texture of moss on the bark -- it turned greenish when it contacted a Paynes Grey streak. In painting rather than drawing, details are brought out by their context. You don't need lots of them. What you need are the ones essential to define the subject if you're going for realism. Walnut Hollow Oil Pencils are a successful way to do them as delicately as you would in a colored pencil painting -- without breaking the look and feel of an oil pastels painting. Some of the areas where I used these pencils are so similar to the look of the Sennelier work that I can't remember which I used where. Some of the tan and brown and black on the chipmunk himself are in Sennelier oil pastels. Control is important for using the sticks for details. You can also blend them and push them around with Colour Shapers or pick up color from one area of your painting or the stick and apply it with the tip of one. Different shapes have different uses. For the smallest dots of color and for clean hard edging, the flat Colour Shaper is the most useful shape. Its corners are a bit sharper than the point of the taper point cone tip, or as fine, and the flat lets some color sit behind that corner to be pressed on or not. For adding small marks over broad areas with Colour Shapers, I recommend using the softest oil pastels you have, Sennelier or Holbein. For laying broad areas of color under them, use the firmer brands such as Cretacolor Aqua Stix, Sakura Cray-Pas Specialist or the mid-firm Neopastel oil pastels. For adding small details without using Colour Shapers, experiment with the reverse -- shape the tip of a hard firm oil pastel or use the corners of square sticks to place the details. Specialists are really good for this. Sometimes what I do with those is lay in the details first and then work outward into broader areas as the points wear down on all four corners of the stick. Using the tip on an angle when blocking in color with square sticks will help create a clean chisel-edged shape on the tip, then you have corners for detailing again. This will work with round sticks as well especially if you need a linear detail, since a curved chisel edge can do beautiful thin lines. For a sharp cone-shaped tip, work around rolling a round stick so that the very tip of the end turns into a pointed cone. Senneliers are already formed with that bullet-tip so they are very easy to maintain by using the sides of the bullet-tip area for blocking in. I just keep adjusting the shape till it's worn down to the paper, then peel some off and I've got a hard edged flat round tip. Paying attention to the shape of the tip of the stick you're working with is a good way to know exactly what kind of mark you'll get when going into a small area -- and thus exactly how much pressure to put. For practice, try drawing a large number of small marks with your oil pastels. Try shaping them into dashes, dots, thin lines and areas of broken color. Wear down the sticks in different directions and see how that affects the marks. A good way to make details stand out is to make the value contrasts and/or color contrasts in them greater. On the chipmunk's back I have black lines and white lines juxtaposed, but the broad light areas of the shelf fungi help to balance that -- and so the shelf fungi needed some of their colors blended to make the sharp little lines of the animal's back gain more focus. Here's a detail view of just the chipmunk showing how the oil pastels strokes and oil pencil strokes look close up. This isn't how most people would look at the finished painting, but it may help to show how small your details can get with those pencils without breaking up the painting. The animal is about 3/4" long on the real painting.

Last, another good method is to create small details with Sgraffito. Put a strong layer of the color you want the detail to be under the area, then go over it with one or more opaque colors adjusting till it's right for the area. Then pick out tiny contrasting marks with a scraping tool -- toothpick, metal scraper, art knife, dental tool or even an Extra Firm Colour Shaper on soft oil pastels. If you aren't sure how well this will work, test your layers and marks on a scrap of the same surface before trying it in a serious painting. It also helps to let the underlayer "set up" overnight or for a couple of days before adding the covering layer fresh and scraping. As you experiment with your oil pastels, you'll find many ways to create key details in your paintings. Just remember -- less is more in a painterly medium. You may find you need fewer of them than you think!
|


