Contour Drawing

Nearly every painting begins with some form of contour drawing. This is a line sketch that describes not just the shape of the subject or the negative space around the subject, but also the shadow areas within the outline of the subject.
Some interesting exercises artists use are blind contour drawing -- looking at the subject without looking at your hand to see where the line goes -- or a continuous line version, where you don't lift your pencil from the paper from beginning to end. Both of these are useful for understanding the complexities of line.
They won't turn out looking as well as a careful contour drawing done without those special rules, but they are a fun challenge that can improve the accuracy of your sketching.
To begin, let's look again at negative space.
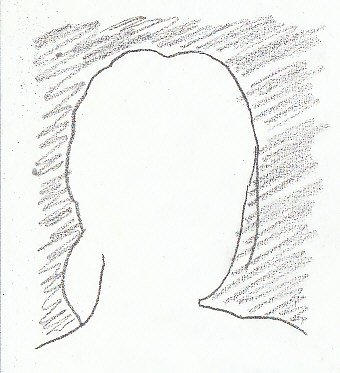
Drawing the area around the subject is often more accurate than drawing the outline of the subject itself. In this first simple contour drawing, I've shown just the line defining the negative space around a woman's head and shaded in the background. Her silhouette is white and you can already tell it's a person from the shape of the contour line -- created by drawing the space where she isn't.

That isn't a perfect example because I followed the line of her neck at first and didn't notice the line of her hair falling against it. Also on the right the line of a stray hair dangling got in as well as a contour drawing of her head shape. Negative space is shaded in on this one to show how an accurate line can be created just by drawing the space around your subject.
The trick is a mental one. Until you have lots of practice with something specific like drawing a person, you'll tend to draw what you think is there rather than what's there. Proportion errors can creep in. Drawing an accurate contour of the spaces is easier because you have no preconceived notion of what that space is. It's just weird and irregular so it's easier to copy without distraction.
Copying is the essence of art anyway.
You copy what you see. Negative space drawing teaches artists to see the shapes of spaces. It's a short but important step to draw shadows as irregular lines and spaces.
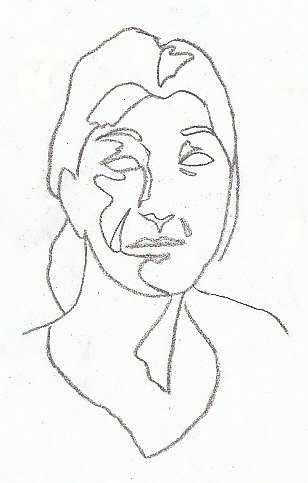
Here is a contour drawing of the same woman's head in pencil, without any of the contour areas filled in. Try to see which shapes are going to be light or dark, looking at it. Copy some of the shapes by hand without regard to what they are, to see how you can show the shapes of features and make them three dimensional by drawing weird-shaped shadows accurately.


If I were going to paint this woman in oil pastels, I would work out the relative value of each of these contour areas. I might create still more small shapes within some of them for lighter and darker values. Reduced to just two values, light and dark, creates a simple kind of
Notan
that could help me plan the painting overall.
If you reduce a sketch entirely to dark and light, then choose all your values darker than the middle in shadow areas and all your light values higher than the middle, the light falling on your painting will look vivid and real. It will be realistic and not look like the contour drawing below yet that will remain as an underlying structure that emphasizes depth, light and drama.
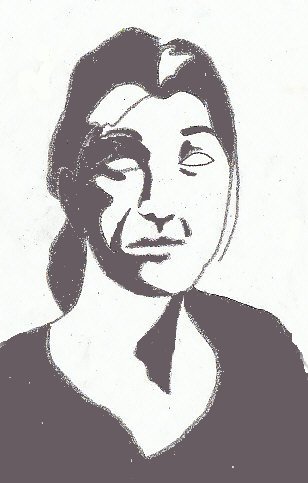
Here is the same drawing with dark values filled in for some contours. I should have paid attention to the area of highlight on her neck and filled in the larger area with shadow. I made a mistake on this one and that contradicts the direction of the light.
Let's look at it and then look at a corrected version.

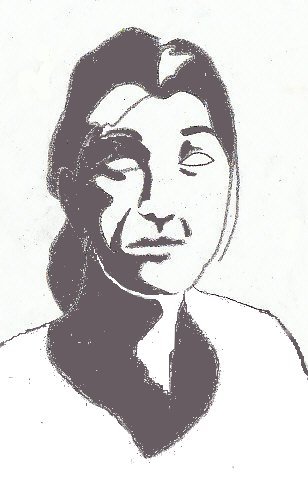
Below is the same contour drawing, corrected to show the patch on the right side of her neck as a highlight. Since this was done from a line sketch in my sketchbook, I didn't know what color her blouse or dress was to begin with. I can decide to make it light or dark depending on what would work better with what else I have.

When you draw anything, from life, a photo reference or imagination, it's important to remember which direction the light comes from. Always put your highlight areas toward that side when a line divides something into light and shadow. You may not remember which side was light if all you have in your sketchbook is the lines, so it's good to create a small notan or value sketch before doing your final painting.
Work large when you do do line drawing in oil pastels. Because the sticks are relatively blunt, small details are harder to create in line work. The good thing is that because of this, your initial sketches will be bold and go right to the important value areas rather than into distracting small details.
Those are best left for the final stages of a painting, not the original sketch that you'll work from in color for several layers. A simple contour drawing is enough information to paint something well and accurately -- and if you keep all your light-area shadows lighter than the dark-area highlights, the lighting in your painting will be bold and dramatic.
My example is a portrait head but you can apply this method to any subject, simple or complex. Trees, shells, flowers, animals can all be broken down into contour drawings. Many artists take their own photos and trace contour drawings from the enlarged photo. This results in good accuracy and saves time if you have trouble getting proportions on the first try.
Because I got used to freehand sketching that convenience becomes inconvenient to me and I'd rather sketch contour drawings by hand. Either way it trains you to see light and dark as coherent irregular areas that can be defined as unique as they are in every situation.
Angle of light can change in an hour outdoors and change those contours, but if you sketch fast you can capture exact time of day in a landscape. A breath can change the contours on a person's face. Even a still life lit by a lamp can be altered if someone bumps the table -- so learning freehand contour drawing is a useful skill that lets you adapt to these changes or even make changes to what a photo reference shows.